OpenSSL 及 X509 证书相关


哈希计算
 1
 2
 3
 4
 5
 6
 7
 8
 9
10
11
12
13
14
15
16
17
18
| # 计算 SHA256 哈希值
openssl dgst -sha256 plaintext.txt
openssl sha256 plaintext.txt
# 等价于:sha256sum plaintext.txt
# 计算 MD5 哈希值
openssl dgst -md5 plaintext.txt
# 等价于:md5sum plaintext.txt
# HMAC
# 不指定,默认为 HMAC-SHA256
openssl dgst -hmac "key" plaintext.txt
# HMAC-MD5
openssl dgst -hmac "key" -md5 plaintext.txt
# HMAC-SHA1
openssl dgst -hmac "key" -sha1 plaintext.txt
# HMAC-SHA256
openssl dgst -hmac "key" -sha256 plaintext.txt
|
编解码
1
2
3
4
5
| # 编码
openssl base64 -in plaintext.txt -out encoded.txt
# 解码
openssl base64 -d -in encoded.txt -out decoded.txt
|
验证网站证书链
 1
 2
 3
 4
 5
 6
 7
 8
 9
10
11
| # 获取网站的完整证书链信息
openssl s_client -showcerts -connect example.com:443
# 保存完整证书链
# </dev/null:确保输入为空。
# 2>/dev/null:将错误输出重定向到空设备,以避免显示不必要的错误信息。
# awk '/BEGIN CERTIFICATE/,/END CERTIFICATE/':使用 awk 提取从 BEGIN CERTIFICATE 到 END CERTIFICATE 的所有内容。
openssl s_client -connect example.com:443 -showcerts </dev/null 2>/dev/null | awk '/BEGIN CERTIFICATE/,/END CERTIFICATE/' >> full_chain.pem
# 查看完整证书链信息
openssl x509 -in full_chain.pem -text -noout
|
随机数
 1
 2
 3
 4
 5
 6
 7
 8
 9
10
11
| # 生成 16 字节的随机数(二进制),并将其保存到 random.bin 文件中,可以用于 AES-128 加密
openssl rand -out random.bin 16
# 生成一个 32 字节的随机密钥,适用于 AES-256 加密
openssl rand -out key.bin 32
# 生成一个 12 字节的随机密码,并以 Base64 编码格式输出
openssl rand -base64 12
# 生成 16 字节的随机数,并以十六进制格式输出到控制台
openssl rand -hex 16
# 生成 32 字节长度二进制随机数,字符数为 32
openssl rand 32 | wc -c # 32
|
RSA
RSA 公私钥生成
 1
 2
 3
 4
 5
 6
 7
 8
 9
10
11
12
13
14
15
16
17
18
19
20
21
22
23
24
25
26
27
| # 生成 2048 位 RSA 私钥
# 后面数字笔试私钥位数,可以选择更长的 4096
openssl genrsa -out private_key.pem 2048 # 简单的生成 rsa 密钥
openssl genrsa -aes256 -out private_key.pem 2048 # 可以对密钥进行 aes-cbc-256 加密
openssl rsa -in encrypted_private_key.pem -out decrypted_private_key.pem # 去除 rsa 密钥
openssl rsa -in private_key.pem -out encrypted_private_key.pem -aes256 # 给 rsa 密钥对称加密
# genpkey 可以生成很多种算法的密钥
openssl genpkey -algorithm RSA -out private_key.pem -pkeyopt rsa_keygen_bits:2048
# 可以生成带加密的密钥,-aes128, -aes192, -aes256, -des, -des3, -camellia256, -camellia128, -camellia192
# 在使用密钥的地方,例如提取公钥时,会要求输入生成密钥时一样的加密密钥解密
openssl genpkey -algorithm RSA -out private_key.pem -pkeyopt rsa_keygen_bits:2048 -aes256
# 从私钥导出公钥
# -pubout 导出公钥文件,不加导出来的仍然是私钥
# 默认导出格式是 base64 的文本 PEM 格式,可以指定 -outform DER 指定二进制文本
# -outform DER or PEM
openssl rsa -in private_key.pem -out public_key.pem -pubout
# 从服务器证书导出公钥
# 导出一个网站的服务器证书
echo | openssl s_client -connect baidu.com:443 -servername baidu.com | openssl x509 > server.crt
# x509 证书中提取公钥文件
openssl x509 -in server.crt -pubkey -noout > publickey.pem
# 打印公钥文件内容,查看信息(也可以作为校验方式)
openssl rsa -pubin -in publickey.pem -text -noout
|
RSA 私钥加密签名, 公钥验签
 1
 2
 3
 4
 5
 6
 7
 8
 9
10
11
12
| # 生成私钥
openssl genpkey -algorithm RSA -out private_key.pem -pkeyopt rsa_keygen_bits:2048
# 从私钥中提取公钥
openssl rsa -pubout -in private_key.pem -out public_key.pem
# 生成待加密文件
echo "这是一个需要加密的消息。" > message.txt
# 私钥签名
openssl dgst -sha256 -sign private_key.pem -out signature.bin message.txt
# 公钥验签
openssl dgst -sha256 -verify public_key.pem -signature signature.bin message.txt
|
RSA 公钥加密, 私钥解密
 1
 2
 3
 4
 5
 6
 7
 8
 9
10
11
12
13
14
15
16
17
| # 生成私钥
openssl genpkey -algorithm RSA -out private_key.pem -pkeyopt rsa_keygen_bits:2048
# 从私钥中提取公钥
openssl rsa -pubout -in private_key.pem -out public_key.pem
# 生成待加密文件
echo "这是一个需要加密的消息。" > message.txt
# 公钥加密
openssl rsautl -encrypt -inkey public_key.pem -pubin -in message.txt -out encrypted_message.bin
# 私钥解密
openssl rsautl -decrypt -inkey private_key.pem -in encrypted_message.bin -out decrypted_message.txt
# 比对解密文件和原文件
cmp message.txt decrypted_message.txt
diff message.txt decrypted_message.txt
md5sum message.txt decrypted_message.txt
|
X.509 证书相关操作
在 X.509 证书中,subject是指证书的主题信息,通常包括以下几个部分:
C:国家代码(Country Name)ST:省份或州代码(State or Province Name)L:城市或地区代码(Locality Name)O:组织名称(Organization Name)OU:组织单位名称(Organizational Unit Name)CN:通用名称(Common Name)emailAddress:电子邮件地址(Email Address)
1
2
| # subject 字符串
/C=CN/ST=Beijing/L=Beijing/O=Example/CN=example.com/emailAddress=info@example.com
|
DER 和 PEM 格式转换
1
2
3
4
| # PEM 转 DER
openssl x509 -in mycert.pem -outform DER -out mycert.der
# DER 转 PEM
openssl x509 -in mycert.der -inform DER -outform PEM -out mycert.pem
|
几种提取公钥的方法
 1
 2
 3
 4
 5
 6
 7
 8
 9
10
11
12
13
14
15
16
17
18
| # 1. 从 RSA 私钥中提取公钥
# -pubout 提取公钥
openssl rsa -pubout -in private_key.pem -out public_key.pem
# 2. 从 CSR(证书签名请求)中提取公钥
# -noout 不打印出 CSR 原文
# -pubkey 提取公钥(创建该 CSR 的服务器私钥对应的公钥
openssl req -in server.csr -noout -pubkey > public_key.pem
# 3. 从 X.509 证书中提取公钥
# -pubkey 提取公钥(创建该证书的服务器私钥对应的公钥
openssl x509 -in server.crt -noout -pubkey > public_key.pem
# 4. 从 PKCS#12 文件中提取公钥
# 先将 p12 提取不带证书的私钥
openssl pkcs12 -in your_file.p12 -nocerts -out private_key.pem
# 再将该私钥提取公钥
openssl rsa -in private_key.pem -pubout
|
私钥生成自签名证书
 1
 2
 3
 4
 5
 6
 7
 8
 9
10
11
12
13
14
15
16
17
18
19
20
21
22
23
24
25
26
27
28
| # 生成私钥
openssl genrsa -out private_key.pem 2048
# 创建 CSR 证书请求,会依次填写以下信息
# CA 证书 Common Name 需要保证唯一性,不要与服务端证书或者客户端证书的 Common Name 相同
# Country Name (2 letter code) [XX]:cn
# State or Province Name (full name) []:bj
# Locality Name (eg, city) [Default City]:bj
# Organization Name (eg, company) [Default Company Ltd]:alibaba
# Organizational Unit Name (eg, section) []:test
# Common Name (eg, your name or your servers hostname) []:root
# Email Address []:a.alibaba.com
# A challenge password []:
# An optional company name []:
openssl req -new -key private_key.pem -out csr.pem
# 查看 CSR 证书信息
openssl req -in csr.pem -noout -text
# 生成自签名证书
# openssl x509 不指定 -CA 和 -CAkey, 额外添加 -signkey 指定一个密钥,即可完成无 CA 的自签名证书
openssl x509 -req -days 365 -in csr.pem -signkey private_key.pem -out certificate.pem
# 或者直接用 subj 代替 csr
# -subj 直接用私钥签发证书,跳过 CSR 创建(subject 表达式包含 CSR 所有内容)
openssl req -new -x509 -key private_key.pem -out certificate.pem -days 365 -subj "/C=CN/ST=Beijing/L=Beijing/O=My Company/CN=example.com"
# 查看证书信息
openssl x509 -in certificate.pem -text -noout
|
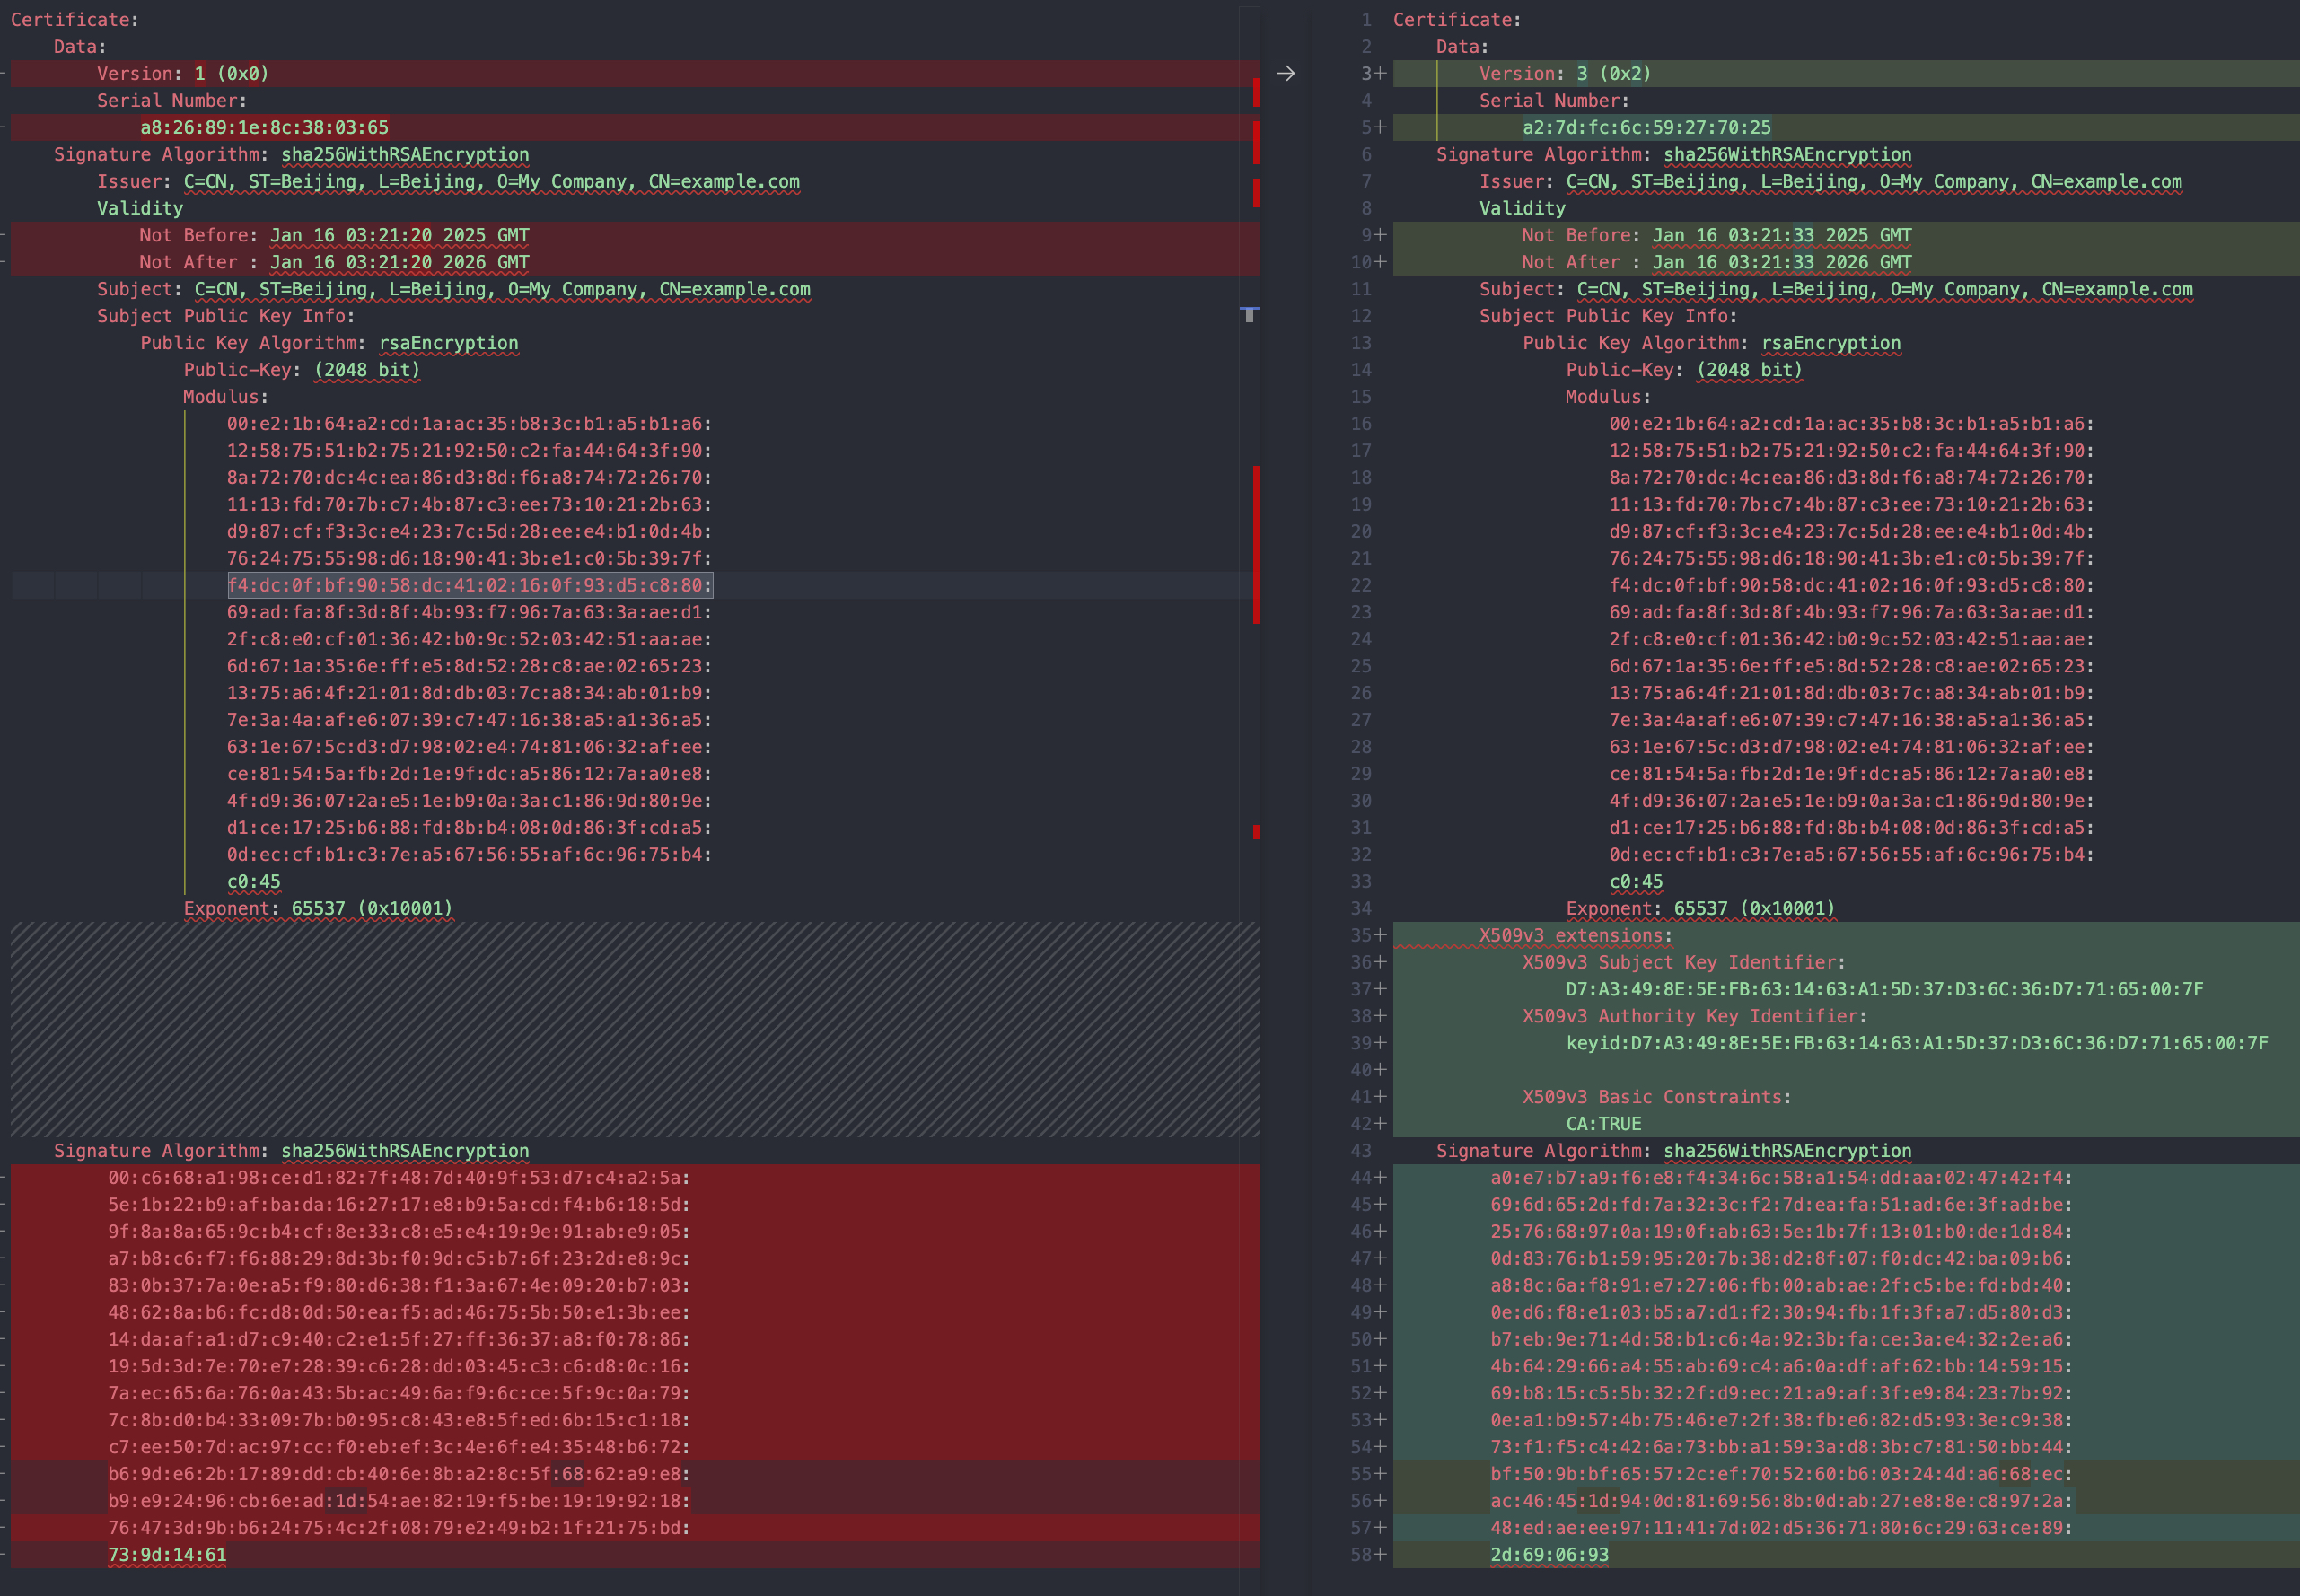
自签名证书的两种方式对比
使用 openssl x509 签发证书,需要输入 CSR 文件,其生成的证书版本为 Version 1,少了 X509v3 的额外标识;(openssl 3.0 以上版本默认生成
X509v3
使用 openssl req 签发证书,可以用 -subj 替代 CSR 文件,其证书版本为 X509v3,有额外的标识信息;
快速生成证书和密钥
这种方式一般可以快速生成 CA 证书及其密钥;
不适用于 CA 签发的证书,因为 CA 签发证书需要用 openssl x509,需要指定 CSR 文件,而不能用 -subj 替代 CSR,另外
openssl req 也没有 -CA -CAKey 选项;只能单独生成 CSR 文件,用 openssl x509 签发证书;
使用 openssl req 默认生成 -keyout 的密钥文件是带加密的 pkcs#8,可以用 openssl rsa 转为 pkcs#1 非加密密钥;也可以执行时添加
-nodes,直接生成不加密密钥
1
2
3
4
5
6
7
| # 根据 -subj 内容签发证书,密钥自动生成
# -nodes,表示生成的密钥是原密钥,不带对称加密,否则需要手动输入对称加密密钥, openssl v3.0 替换为 -noenc
# -newkey rsa:2048,表示生成的密钥为 RSA 密钥,2048 位,同样支持 1024, 3072, 4096, 8192 等
# -keyout, 指定输出的密钥文件
# -out, 指定签发的证书文件
# -days, 指定有效期,开始时间从签发时刻算起
openssl req -x509 -new -nodes -keyout rootCA.key -out rootCA.pem -days 365 -subj "/CN=Root CA" -newkey rsa:2048
|
openssl 3.0 以上版本,openssl req 可以附加 -CA 和 -CAKey 选项,实现快速 CA 签发证书
1
| openssl req -x509 -new -nodes -keyout server.key -out server.crt -days 365 -subj "/CN=server.example.com" -CA rootCA.pem -CAkey rootCA.key
|
openssl 3.0 以上,可以设置证书有效期起始时间和终止时间 -not_before -not_after ,日期格式为 YYYYMMDDHHMMSSZ,其中
Z表示 UTC 时区。-not_after 会将 -days 覆盖失效;如果只用 -not_before 和 -days ,终止时间是从执行命令开始计算 +
days 天的时间,而不是起始时间开始追加;
1
| openssl req -x509 -new -nodes -keyout server.key -out server.crt -subj "/CN=server.example.com" -CA rootCA.pem -CAkey rootCA.key -not_before 20060102150405Z -not_after 20250102150405Z
|
校验私钥与证书是否匹配
1
2
3
4
5
6
| # 生成自签名证书
openssl genrsa -out server.key 2048
openssl req -new -x509 -key server.key -out server.crt -days 365 -subj "/C=CN/ST=Beijing/L=Beijing/O=My Company/CN=example.com"
# 计算证书和私钥的模数,相等则匹配
openssl x509 -in server.crt -noout -modulus | openssl md5
openssl rsa -in server.key -noout -modulus | openssl md5
|
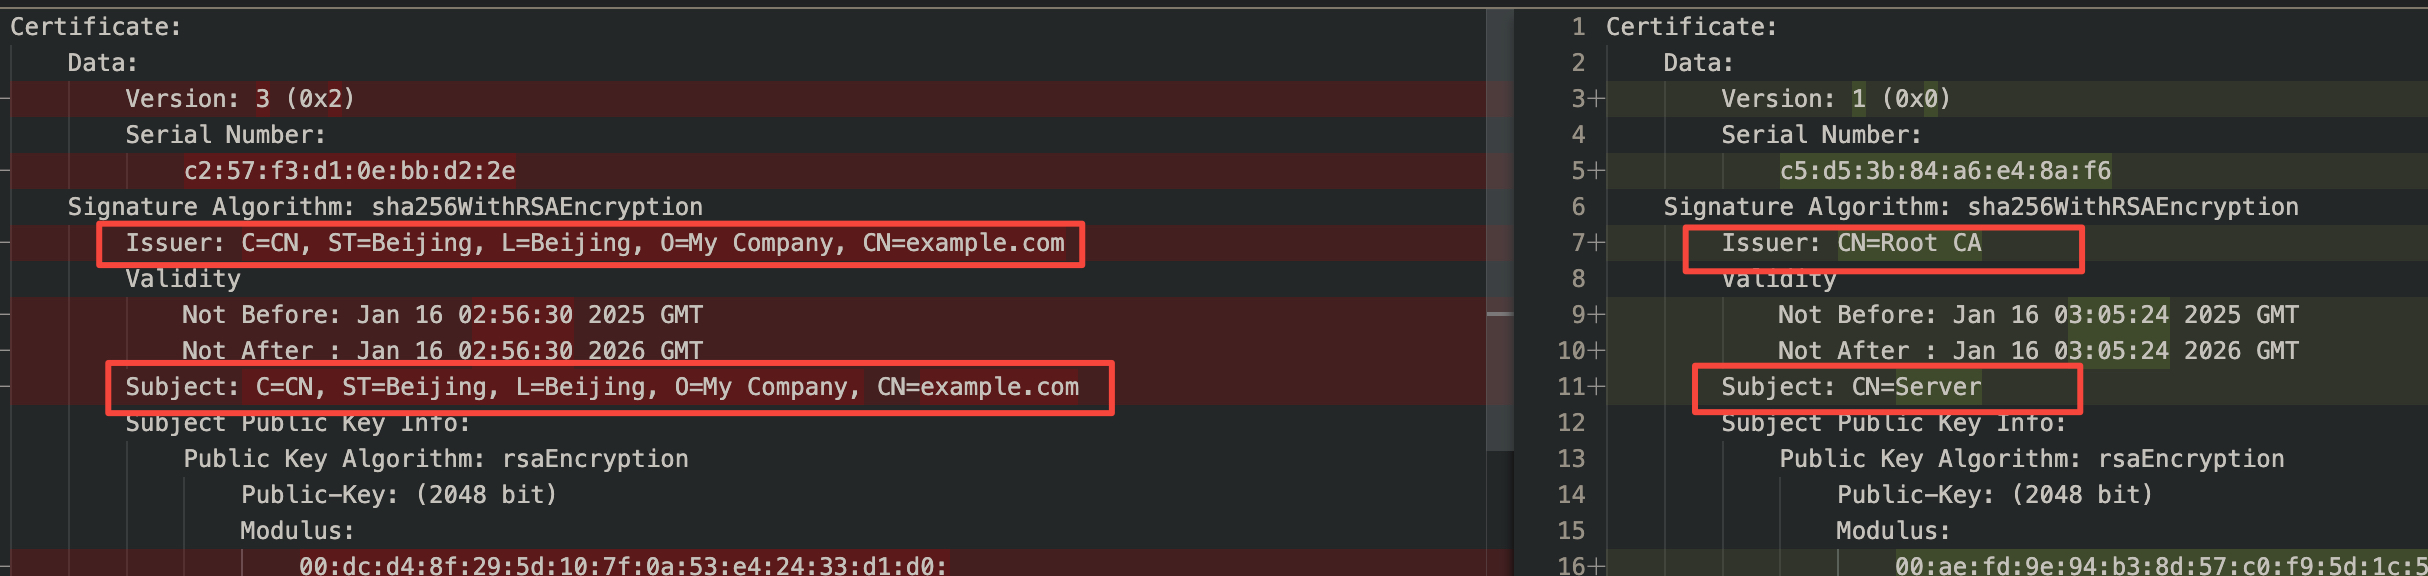
CA 签发证书
 1
 2
 3
 4
 5
 6
 7
 8
 9
10
11
12
13
14
| # 快速生成根证书和密钥
openssl req -x509 -new -nodes -keyout rootCA.key -out rootCA.pem -days 365 -subj "/CN=Root CA" -newkey rsa:2048
# 生成服务器密钥和 CSR
openssl genrsa -out server.key 2048
openssl req -new -key server.key -out server.csr -subj "/CN=Server"
# 验证 CSR
openssl req -in server.csr -noout -text
# 使用根证书签署服务器证书
# -CAcreateserial, 生成一个序列号并将其写入一个名为 serial 的文件
openssl x509 -req -in server.csr -CA rootCA.pem -CAkey rootCA.key -CAcreateserial -out server.crt -days 365
# 验证证书
openssl x509 -in server.crt -noout -text
# 用 CA 证书验证服务器证书
openssl verify -CAfile rootCA.pem server.crt
|
使用 CA 签发证书不能使用上述「快速生成证书和密钥」,因为需要用到 CSR 文件,因此需要单独生成密钥和 CSR
CA签发证书与自签名证书不同点
- 自签名证书的 Issuer 颁发者也是自己
- CA 签发证书的 Issuer 是 CA
使用配置文件创建 CSR 和 X509 证书
配置文件的创建方式较为麻烦,但是提供更加精细化的定制配置,一般来说以上的创建方式足够自签名使用,无需配置文件方式创建;
配置文件创建 CSR
创建 csr.cnf 文件
 1
 2
 3
 4
 5
 6
 7
 8
 9
10
11
12
13
14
15
16
17
18
19
20
21
22
23
24
25
26
27
28
29
30
31
32
33
34
35
| # 配置文件用于生成 CSR
[ req ]
default_bits = 2048 # 密钥长度,常见值:2048(常用), 3072, 4096
default_keyfile = server.key # 生成的私钥文件名
default_md = sha256 # 签名哈希算法,推荐使用 SHA256(常用), SHA384, SHA512
prompt = no # 是否交互式输入信息
distinguished_name = req_distinguished_name # 指定主体字段的配置部分
req_extensions = req_ext # CSR 的扩展部分,引用 [req_ext]
[ req_distinguished_name ]
C = CN # 国家代码(两位字母,如 CN、US)
ST = Beijing # 州或省份
L = Beijing # 城市
O = ExampleCorp # 组织名称
OU = IT Department # 组织单元
CN = example.com # 通用名称(域名或 IP 地址)
[ req_ext ]
subjectAltName = @alt_names # 引用 [alt_names] 定义 SAN 扩展
basicConstraints = critical,CA:TRUE,pathlen:0 # 基本约束
keyUsage = critical, digitalSignature, keyEncipherment # 公钥用途
extendedKeyUsage = serverAuth, clientAuth # 扩展用途
subjectKeyIdentifier = hash # 主题密钥标识符
crlDistributionPoints = @disribution_points # CRL 分发点
certificatePolicies = 1.3.6.1.4.1.12345.1.1.1, 1.2.3.4.5.6.7.8.9.1 # 证书策略
authorityInfoAccess = OCSP;URI:http://ocsp.example.com/, caIssuers;URI:http://myca.example.com/ca.cer # 授权信息访问
[ alt_names ]
DNS.1 = example.com # 替代名称:域名
DNS.2 = www.example.com # 替代名称:子域名
IP.1 = 192.168.1.1 # 替代名称:IP 地址
email = info@example.com # 替代名称:邮箱
[ disribution_points ]
URI = http://crl.example.com/crl.pem
|
1
2
3
4
5
6
7
8
| # 生成根证书和密钥
openssl req -x509 -new -nodes -keyout rootCA.key -out rootCA.pem -days 365 -subj "/CN=Root CA" -newkey rsa:2048
# 生成服务器私钥和 CSR 文件
# -nodes,生成不加密的服务器密钥
# -config 指定 CSR 配置文件
openssl req -new -nodes -config csr.cnf -out server.csr
# 查看 CSR 内容
openssl req -in server.csr -noout -text
|
CSR 内容:
 1
 2
 3
 4
 5
 6
 7
 8
 9
10
11
12
13
14
15
16
17
18
19
20
21
22
| Subject: C=CN, ST=Beijing, L=Beijing, O=ExampleCorp, OU=IT Department, CN=example.com
...
Requested Extensions:
X509v3 Subject Alternative Name:
DNS:example.com, DNS:www.example.com, IP Address:192.168.1.1, email:info@example.com
X509v3 Basic Constraints: critical
CA:TRUE, pathlen:0
X509v3 Key Usage: critical
Digital Signature, Key Encipherment
X509v3 Extended Key Usage:
TLS Web Server Authentication, TLS Web Client Authentication
X509v3 Subject Key Identifier:
73:80:FD:8E:8F:D0:7E:4E:CB:87:A2:DC:60:44:4B:4F:66:70:73:5A
X509v3 CRL Distribution Points:
Full Name:
URI:http://crl.example.com/crl.pem
X509v3 Certificate Policies:
Policy: 1.3.6.1.4.1.12345.1.1.1
Policy: 1.2.3.4.5.6.7.8.9.1
Authority Information Access:
OCSP - URI:http://ocsp.example.com/
CA Issuers - URI:http://myca.example.com/ca.cer
|
注:该 CSR 里的扩展内容 Requested Extensions,直接应用到 X509 证书签发时,不会直接应用到证书中;例如 CSR 虽然配置了 SAN,但是
X509 证书是没有的,必须在签发 X509 证书时显式指定出来
1
2
3
4
5
6
| # 使用根证书签署服务器证书
openssl x509 -req -in server.csr -CA rootCA.pem -CAkey rootCA.key -CAcreateserial -out server.crt -days 365
# 验证证书
openssl x509 -in server.crt -noout -text
# 用 CA 证书验证服务器证书
openssl verify -CAfile rootCA.pem server.crt
|
实际只有基础项,而不具有扩展内容
1
2
3
4
5
| X509v3 extensions:
X509v3 Subject Key Identifier:
73:80:FD:8E:8F:D0:7E:4E:CB:87:A2:DC:60:44:4B:4F:66:70:73:5A
X509v3 Authority Key Identifier:
30:7B:AA:31:4F:DA:F0:F4:22:22:6B:E9:96:C4:BF:A5:84:10:DB:03
|
配置文件创建 X509 证书
创建 X509v3 配置文件 v3.ext
 1
 2
 3
 4
 5
 6
 7
 8
 9
10
11
12
13
14
15
16
17
18
19
20
21
22
23
24
25
26
27
28
29
30
31
32
33
34
35
36
37
38
39
40
41
42
43
44
| # 配置文件用于签发证书时的扩展设置
# CA 证书扩展
[ v3_ca ]
authorityKeyIdentifier = keyid:always,issuer # 授权密钥标识符
basicConstraints = critical,CA:TRUE,pathlen:1 # 标记为 CA,限制链长度
keyUsage = critical, digitalSignature, keyCertSign, cRLSign # 密钥用途
subjectKeyIdentifier = hash # 主题密钥标识符
nameConstraints = permitted;email:.example.com;DNS:.example.com # 名称约束
# 服务器证书扩展
[ v3_server ]
authorityKeyIdentifier = keyid,issuer # 授权密钥标识符
subjectKeyIdentifier = hash # 主题密钥标识符
basicConstraints = critical,CA:FALSE # 标记为非 CA 证书
keyUsage = critical, digitalSignature, keyEncipherment # 密钥用途
extendedKeyUsage = serverAuth,clientAuth # 扩展密钥用途,标记为服务器认证和客户端认证
subjectAltName = DNS:example.com, DNS:www.example.com, IP:192.168.1.1, email:info@example.com # SAN 扩展
crlDistributionPoints = URI:http://example.com/crl.pem # CRL 分发点
certificatePolicies = 1.3.6.1.4.1.12345.1.1.1, 1.2.3.4.5.6.7.8.9.1 # 证书策略
authorityInfoAccess = OCSP;URI:http://ocsp.example.com/, caIssuers;URI:http://myca.example.com/ca.cer # 授权信息访问
# 客户端证书扩展
[ v3_client ]
authorityKeyIdentifier = keyid,issuer
basicConstraints = CA:FALSE
keyUsage = critical, digitalSignature, keyEncipherment
extendedKeyUsage = clientAuth # 客户端认证用途
subjectAltName = email:client@example.com
nsComment = "OpenSSL Generated Certificate" # 注释
# OCSP 证书扩展
[ v3_ocsp ]
authorityKeyIdentifier = keyid,issuer
basicConstraints = CA:FALSE
keyUsage = critical, digitalSignature
extendedKeyUsage = OCSPSigning # OCSP 签名用途
# 时间戳证书扩展
[ v3_timestamp ]
authorityKeyIdentifier = keyid,issuer
basicConstraints = CA:FALSE
keyUsage = critical, digitalSignature
extendedKeyUsage = timeStamping # 时间戳用途
|
延续上方示例,生成 rootCA.pem, rootCA.key, server.csr;
使用配置文件的方式,创建 CA 签发的服务器 X509v3 证书
在根证书签发服务器证书基础上,添加 -extfile 指定以上配置文件,同时 -extensions 指定对应的证书扩展项名,如服务器证书扩展是
v3_server,名字可以自定义;如果该配置文件平铺,不归类,类似 properties 配置文件形式,则可以忽略 -extensions
1
2
3
4
5
| # -extfile 指定 x509v3 配置文件
openssl x509 -req -in server.csr -CA rootCA.pem -CAkey rootCA.key -CAcreateserial \
-out server.crt -days 365 -extfile v3.ext -extensions v3_server
# CA 验证证书
openssl verify -CAfile rootCA.pem server.crt
|
证书扩展内容:
 1
 2
 3
 4
 5
 6
 7
 8
 9
10
11
12
13
14
15
16
17
18
19
20
21
22
| X509v3 extensions:
X509v3 Subject Key Identifier:
73:80:FD:8E:8F:D0:7E:4E:CB:87:A2:DC:60:44:4B:4F:66:70:73:5A
X509v3 Authority Key Identifier:
30:7B:AA:31:4F:DA:F0:F4:22:22:6B:E9:96:C4:BF:A5:84:10:DB:03
X509v3 Basic Constraints: critical
CA:FALSE
X509v3 Key Usage: critical
Digital Signature, Key Encipherment
X509v3 Extended Key Usage:
TLS Web Server Authentication, TLS Web Client Authentication
X509v3 Subject Alternative Name:
DNS:example.com, DNS:www.example.com, IP Address:192.168.1.1, email:info@example.com
X509v3 CRL Distribution Points:
Full Name:
URI:http://example.com/crl.pem
X509v3 Certificate Policies:
Policy: 1.3.6.1.4.1.12345.1.1.1
Policy: 1.2.3.4.5.6.7.8.9.1
Authority Information Access:
OCSP - URI:http://ocsp.example.com/
CA Issuers - URI:http://myca.example.com/ca.cer
|
其他类型证书同理,只需要修改 -extensions 找到对应分组即可,或单独创建配置文件
X509v3 扩展参数
X.509 v3 证书通过扩展字段增加功能和灵活性,以下是常见的扩展:
Basic Constraints: 指示证书的基本约束
- CA(Certificate Authority):指示该证书是否可以用作证书颁发机构的证书。如果设置为
CA:TRUE,则表示该证书可以用于签发其他证书;如果设置为
CA:FALSE,则表示该证书不能用于签发其他证书。 - 路径长度限制(Path Length Constraint):这是一个可选的整数值,表示从该证书开始的证书链中,最多可以有多少个中间 CA 证书(该
CA 证书允许签发证书数上限)。如果没有设置路径长度限制,则表示没有限制。
- 当
basicConstraints 被标记为 critical 时,表示该扩展是关键的,必须被所有使用该证书的应用程序理解。如果应用程序不支持或不理解这个扩展,它应该拒绝使用该证书。这意味着
basicConstraints 的存在和内容对于证书的正确使用是至关重要的。
1
| basicConstraints = critical,CA:FALSE,pathlen:2
|
1
2
3
| X509v3 extensions:
X509v3 Basic Constraints: critical
CA:FALSE, pathlen:2
|
Key Usage: 定义公钥的用途,如签名、加密或密钥协商等
- digitalSignature: 允许使用该公钥进行数字签名,例如用于身份验证和数据完整性。(常用
- nonRepudiation: 允许使用该公钥进行不可否认性签名,通常用于证明某个操作的真实性。
- keyEncipherment: 允许使用该公钥加密密钥,例如在 SSL/TLS 中用于加密会话密钥。(常用
- dataEncipherment: 允许使用该公钥加密数据。
- keyAgreement: 允许使用该公钥进行密钥协商,例如在 Diffie-Hellman 密钥交换中。
- keyCertSign: 允许使用该公钥签署证书。(通常用于 CA 证书
- cRLSign: 允许使用该公钥签署证书撤销列表 (CRL)。(通常用于 CA 证书
- encipherOnly: 仅允许使用该公钥进行加密操作,通常用于密钥协商。
- decipherOnly: 仅允许使用该公钥进行解密操作,通常用于密钥协商。
1
| keyUsage = critical, digitalSignature, keyEncipherment
|
1
2
| X509v3 Key Usage: critical
Digital Signature, Key Encipherment
|
Extended Key Usage (EKU): 进一步定义证书中公钥的特定用途
- serverAuth: 允许证书用于服务器身份验证,通常用于 SSL/TLS 服务器证书。(常用
- clientAuth: 允许证书用于客户端身份验证,通常用于 SSL/TLS 客户端证书。(常用
- codeSigning: 允许证书用于代码签名,确保软件的完整性和来源。
- emailProtection: 允许证书用于电子邮件保护,通常用于 S/MIME 电子邮件加密和签名。
- timeStamping: 允许证书用于时间戳服务,确保数据在特定时间点的存在性。
- OCSPSigning: 允许证书用于在线证书状态协议 (OCSP) 签名,通常用于证书状态检查。
- ipsecEndSystem: 允许证书用于 IPsec 终端系统。
- ipsecTunnel: 允许证书用于 IPsec 隧道。
- ipsecUser: 允许证书用于 IPsec 用户。
1
| extendedKeyUsage = serverAuth, clientAuth
|
1
2
| X509v3 Extended Key Usage:
TLS Web Server Authentication, TLS Web Client Authentication
|
Subject Alternative Name (SAN): 用于指定证书的替代主题名称,这些名称可以是 DNS 名称、IP 地址、电子邮件地址等,这使得证书可以支持多个域名或其他标识符,而不需要为每个名称单独生成证书
- 多域名支持: SAN 允许一个证书同时支持多个域名。例如,一个 SSL/TLS 证书可以同时保护 www.example.com 和 example.net。
- IP 地址: SAN 可以包含 IP 地址,允许证书用于特定的 IP 地址。
- 电子邮件地址: SAN 也可以包含电子邮件地址,适用于 S/MIME 证书。
- 其他名称: SAN 还可以包含其他类型的名称,例如 URI 或其他自定义标识符。
1
| subjectAltName = DNS:www.example.com, DNS:example.com, IP:192.168.1.1, email:info@example.com
|
1
2
| X509v3 Subject Alternative Name:
DNS:www.example.com, DNS:example.com, IP Address:192.168.1.1, email:info@example.com
|
Authority Key Identifier (AKI): 用于帮助识别签发该证书的证书颁发机构 (CA) 的公钥,是签发该证书 CA 的公钥哈希值
1
| authorityKeyIdentifier=keyid,issuer
|
1
2
| X509v3 Authority Key Identifier:
keyid:CD:EE:95:A0:85:70:4B:59:6D:99:CA:6D:BE:7D:EB:FB:88:7B:64:35
|
Subject Key Identifier (SKI): 是当前证书的公钥哈希值,如果使用该证书(CA)签发其他的证书,则子证书的 AKI 对应本证书的 SKI
1
| subjectKeyIdentifier = hash
|
1
2
| X509v3 Subject Key Identifier:
B9:AE:C9:13:AD:A7:C4:E4:51:A5:56:18:5C:2B:F6:E4:1E:95:C6:AB
|
CRL Distribution Points (CRL DP): 用于指示证书撤销列表 (CRL) 的分发位置
1
| crlDistributionPoints = URI:http://crl.example.com/crl.pem
|
1
2
3
4
| X509v3 CRL Distribution Points:
Full Name:
URI:http://crl.example.com/crl.pem
|
Certificate Policies: 使用逗号分隔的格式来定义多个政策。每个政策由 OID 和相应的限定符
1
| certificatePolicies = 1.3.6.1.4.1.12345.1.1.1, 1.2.3.4.5.6.7.8.9.1
|
1
2
3
| X509v3 Certificate Policies:
Policy: 1.3.6.1.4.1.12345.1.1.1
Policy: 1.2.3.4.5.6.7.8.9.1
|
Authority Information Access (AIA): 用于提供有关如何访问证书颁发机构 (CA) 的信息,通常包含指向 CA 证书和在线证书状态协议 (OCSP) 服务器的 URL
1
| authorityInfoAccess = OCSP;URI:http://ocsp.example.com/, caIssuers;URI:http://myca.example.com/ca.cer
|
1
2
3
| Authority Information Access:
OCSP - URI:http://ocsp.example.com/
CA Issuers - URI:http://myca.example.com/ca.cer
|
 1
 2
 3
 4
 5
 6
 7
 8
 9
10
11
12
13
14
15
16
17
18
19
20
21
| # 生成根证书和密钥
openssl req -x509 -new -nodes -keyout rootCA.key -out rootCA.pem -days 365 -subj "/CN=Root CA" -newkey rsa:2048
# 生成服务器密钥和 CSR:
openssl genrsa -out server.key 2048
openssl req -new -key server.key -out server.csr -subj "/CN=Server"
# 创建扩展配置文件:
# 创建一个文件 v3.ext,包含如下内容:
authorityKeyIdentifier=keyid,issuer
basicConstraints=CA:FALSE
keyUsage=digitalSignature, keyEncipherment
extendedKeyUsage=serverAuth
subjectAltName=DNS:example.com, DNS:www.example.com, IP:192.168.1.1
# 使用根证书签署服务器证书:
# 使用 -extfile 和 -extensions 参数指定扩展配置文件:
openssl x509 -req -in server.csr -CA rootCA.pem -CAkey rootCA.key -CAcreateserial -out server.crt -days 365 -extfile v3.ext
# 验证生成的证书
openssl x509 -in server.crt -noout -text
# 验证证书链
openssl verify -CAfile rootCA.pem server.crt
|
PKCS 证书格式转换
PKCS(Public Key Cryptography Standards)是由 RSA 实验室制定的一系列标准,主要用于公钥密码学。PKCS 的不同版本和编号代表了不同的标准和规范。
导出不同格式证书
PKCS#1:仅包含私钥信息,不包含证书链信息。主要存储 RSA 公钥和私钥(公钥可从私钥中提取PKCS#8 :存储私钥,不仅限于 RSA(DSA、ECDSA、RSA等,常用于多类型私钥常见:Java KeyStore、OpenSSL 等,比 PKCS#1 更通用;私钥首先会使用
PKCS#5 的标准进行加密,然后将其进行 base64 编码,转换成为 PEM 格式进行存储PKCS#7:包含证书链信息,但不包含私钥信息。PKCS#12:可以存储证书,私钥或者 CRL。和 PKCS#7 相比,PKCS#12 可以额外存储私钥。- 在实际应用中,
PKCS#12 格式的证书通常用于导入到浏览器或其他客户端应用程序中,而 PKCS#1 和 PKCS#7
格式的证书则通常用于服务器端应用程序或其他特定场景。 - PKCS12的文件是以
.p12 或者 .pfx 结尾的
PKCS#10 :定义证书请求格式,用于申请数字证书,即 CSR (Certificate Signing Request) 文件
PKCS#1, PKCS#8, PKCS#10, x509 证书相关
 1
 2
 3
 4
 5
 6
 7
 8
 9
10
11
12
13
14
15
| # 生成 2048 位 RSA 私钥,输出到 private_key.pem 文件
# genrsa 命令用于生成符合 PKCS#1 标准的 RSA 私钥
openssl genrsa -out private_key.pem 2048
# 使用 -pubout 参数从私钥中导出公钥
openssl rsa -in private_key.pem -pubout -out public_key.pem
# 创建证书签名请求
# PKCS#10 定义了证书请求格式。-subj 参数指定证书主题信息,例如国家 (C)、州 (ST)、组织 (O) 等
openssl req -new -key private_key.pem -out csr.pem -subj "/C=CN/ST=Beijing/L=Beijing/O=MyCompany/OU=IT Department/CN=example.com"
# 用私钥和证书请求生成 x509 自签名证书
openssl x509 -req -in csr.pem -signkey private_key.pem -out certificate.pem -days 365
# 查看证书内容
openssl x509 -in certificate.pem -text -noout
|
PKCS#1 和 PKCS#8 互转
 1
 2
 3
 4
 5
 6
 7
 8
 9
10
11
12
13
14
15
16
17
18
19
20
21
22
23
24
25
26
27
28
29
30
31
32
33
34
35
36
37
38
39
40
41
42
43
44
45
46
47
48
49
50
51
52
53
54
55
56
57
58
59
60
61
62
63
| # 生成 PKCS#1 格式的 RSA 私钥
openssl genrsa -out rsa_pkcs1.key 2048
# 验证文件格式
openssl rsa -in rsa_pkcs1.key -text -noout
===========
# 将 PKCS#1 私钥转换为 PKCS#8 格式(非加密)
openssl pkcs8 -topk8 -inform PEM -in rsa_pkcs1.key -outform PEM -nocrypt -out rsa_pkcs8.key
# 验证文件格式
openssl pkey -in rsa_pkcs8.key -text -noout
# 将 PKCS#1 私钥转换为 PKCS#8 格式(加密)
# -passout, 指定加密密钥
openssl pkcs8 -topk8 -inform PEM -in rsa_pkcs1.key -outform PEM -out rsa_pkcs8_encrypted.key -passout pass:yourpassword
# 验证加密的 PKCS#8 文件
openssl pkey -in rsa_pkcs8_encrypted.key -text -noout -passin pass:yourpassword
# 将 PKCS#8 私钥还原为 PKCS#1 格式
openssl rsa -in rsa_pkcs8.key -out rsa_pkcs1_restored.key
# 验证还原后的文件
openssl rsa -in rsa_pkcs1_restored.key -text -noout
===========
## 验证私钥生成的公钥
# 提取公钥(从 PKCS#1 私钥)
openssl rsa -in rsa_pkcs1.key -pubout -out public_key_from_pkcs1.pem
# 提取公钥(从 PKCS#8 私钥)
openssl pkey -in rsa_pkcs8.key -pubout -out public_key_from_pkcs8.pem
# 验证公钥格式
openssl rsa -pubin -in public_key_from_pkcs1.pem -text -noout
openssl rsa -pubin -in public_key_from_pkcs8.pem -text -noout
## 签名和验证测试
# 用 PKCS#1 私钥签名
echo "Test message" > test_message.txt
openssl dgst -sha256 -sign rsa_pkcs1.key -out signature.bin test_message.txt
# 用 PKCS#1 公钥验证签名
openssl dgst -sha256 -verify public_key_from_pkcs1.pem -signature signature.bin test_message.txt
# 用 PKCS#8 私钥签名
openssl dgst -sha256 -sign rsa_pkcs8.key -out signature_pkcs8.bin test_message.txt
# 用 PKCS#8 公钥验证签名
openssl dgst -sha256 -verify public_key_from_pkcs8.pem -signature signature_pkcs8.bin test_message.txt
## 加密和解密验证测试
# 用 PKCS#1 公钥加密
openssl rsautl -encrypt -inkey public_key_from_pkcs1.pem -pubin -in test_message.txt -out encrypted_message_pkcs1.bin
# 用 PKCS#1 私钥解密
openssl rsautl -decrypt -inkey rsa_pkcs1.key -in encrypted_message_pkcs1.bin -out decrypted_message_pkcs1.txt
# 验证 PKCS#1 解密结果
diff test_message.txt decrypted_message_pkcs1.txt
# 用 PKCS#8 公钥加密
openssl rsautl -encrypt -inkey public_key_from_pkcs8.pem -pubin -in test_message.txt -out encrypted_message_pkcs8.bin
# 用 PKCS#8 私钥解密
openssl rsautl -decrypt -inkey rsa_pkcs8.key -in encrypted_message_pkcs8.bin -out decrypted_message_pkcs8.txt
# 验证 PKCS#8 解密结果
diff test_message.txt decrypted_message_pkcs8.txt
|
PKCS#7 证书链相关
 1
 2
 3
 4
 5
 6
 7
 8
 9
10
11
12
13
14
15
16
17
18
19
20
21
22
23
24
25
26
27
28
| # 生成根证书和私钥
openssl genrsa -out rootCA.key 2048
openssl req -x509 -new -key rootCA.key -out rootCA.pem -days 365 -subj "/CN=Root CA"
# 生成中间证书和私钥
openssl genrsa -out intermediateCA.key 2048
openssl req -new -key intermediateCA.key -out intermediateCA.csr -subj "/CN=Intermediate CA"
# 验证 csr
openssl req -in intermediateCA.csr -noout -text
# 使用根证书签署中间证书
openssl x509 -req -in intermediateCA.csr -CA rootCA.pem -CAkey rootCA.key -CAcreateserial -out intermediateCA.pem -days 365
# 验证证书
openssl x509 -in intermediateCA.pem -text -noout
# 生成证书链
cat intermediateCA.pem rootCA.pem > cert_chain.pem
# 验证证书链
openssl verify -CAfile rootCA.pem intermediateCA.pem
# 使用证书创建 PKCS#7
# crl2pkcs7 用于生成 PKCS#7 格式的证书链,-nocrl 表示不包括证书吊销列表 (CRL)
openssl crl2pkcs7 -certfile cert_chain.pem -out cert_chain.p7b -nocrl
# 验证 PKCS#7 文件
openssl pkcs7 -print -in cert_chain.p7b
# 将 PKCS#7 里的证书链提取出来
openssl pkcs7 -in cert_chain.p7b -print_certs -out extracted_certs.pem
|
PKCS#12 相关
 1
 2
 3
 4
 5
 6
 7
 8
 9
10
11
12
13
14
15
16
17
18
19
20
21
22
23
24
25
26
27
28
29
30
31
32
33
34
35
36
37
38
39
40
41
42
43
44
45
| # 生成自签名根证书和私钥
openssl req -x509 -new -nodes -keyout rootCA.key -out rootCA.pem -days 365 -subj "/CN=Root CA" -newkey rsa:2048
# 根证书签发中间 CA 证书 1
openssl genrsa -out intermediateCA1.key 2048
openssl req -new -key intermediateCA1.key -out intermediateCA1.csr -subj "/CN=Intermediate CA 1"
openssl x509 -req -in intermediateCA1.csr -CA rootCA.pem -CAkey rootCA.key -CAcreateserial -out intermediateCA1.pem -days 365
openssl x509 -in intermediateCA1.pem -text -noout
# 中间 CA 1 证书签发中间 CA 证书 2
openssl genrsa -out intermediateCA2.key 2048
openssl req -new -key intermediateCA2.key -out intermediateCA2.csr -subj "/CN=Intermediate CA 2"
openssl x509 -req -in intermediateCA2.csr -CA intermediateCA1.pem -CAkey intermediateCA1.key -CAcreateserial -out intermediateCA2.pem -days 365
openssl x509 -in intermediateCA2.pem -text -noout
# 创建完整的证书链
cat intermediateCA2.pem intermediateCA1.pem rootCA.pem > chain.pem
# 生成 PKCS#12 文件
# -inkey 指定服务器私钥
# -certfile 指定证书链
# -in 指定服务器证书
# -name 指定证书的名称
# -password 对 p12 加密密钥; 密码文件: file:password.txt; 明文密码: pass:yourpassword; stdin 标准输入录入密码
openssl pkcs12 -export -out server.p12 -inkey server.key -in server.crt -certfile chain.pem -name "ServerCert" -password pass:yourpassword
# 导出证书和私钥的 PEM 格式,该 server.pem 可以被安装到服务器中
# -nodes 表示导出的 PEM 不加密码,里面包含密钥,因此推荐加密码
openssl pkcs12 -in server.p12 -out server.pem -nodes
# p12 提取私钥
# -password 是p12 文件的加密的密码
# -nodes 对导出的密钥文件不加密
openssl pkcs12 -in server.p12 -nocerts -out extracted_key.pem -password pass:yourpassword -nodes
# p12 提取证书
# -clcerts 提取服务器证书
# -nokeys 不包含私钥
# -password 是p12 文件的加密的密码
openssl pkcs12 -in server.p12 -clcerts -nokeys -out extracted_cert.pem -password pass:yourpassword
# p12 提取完整证书链(不包含服务器证书)
# -cacerts 提取证书链,不包含私钥和服务器证书
# -password 是p12 文件的加密的密码
openssl pkcs12 -in server.p12 -cacerts -nokeys -out extracted_chain.pem -password pass:yourpassword
|
ECC
椭圆曲线密码学(Elliptic Curve Cryptography,ECC)
 1
 2
 3
 4
 5
 6
 7
 8
 9
10
11
12
13
14
15
16
17
| # 查看可用的椭圆曲线参数
openssl ecparam -list_curves
# 生成 ECC 私钥,-name 选择椭圆曲线参数
openssl ecparam -genkey -name prime256v1 -out ec_private_key.pem
# 验证 ECC 私钥详细信息
openssl ec -in ec_private_key.pem -text -noout
# 查看椭圆曲线详细参数
openssl ecparam -name prime256v1 -text -param_enc explicit
# 根据 ECC 私钥获取公钥,-name 保持一致
openssl ecparam -name prime256v1 -in ec_private_key.pem -out ec_public_key.pem
# 查看公钥内容
openssl ec -pubin -in ec_public_key.pem -text -noout
|
ECC 转换格式
1
2
3
4
5
6
7
8
| # ECC 私钥从 PEM 转为 DER 格式
openssl ec -in ec_private_key.pem -outform DER -out ec_private_key.der
# ECC 公钥从 PEM 转为 DER 格式
openssl ec -pubin -in ec_public_key.pem -outform DER -out ec_public_key.der
# ECC 私钥从 DER 转为 PEM 格式
openssl ec -inform DER -in ec_private_key.der -out ec_private_key.pem
# ECC 公钥从 DER 转为 PEM 格式
openssl ec -pubin -inform DER -in ec_public_key.der -out ec_public_key.pem
|
ECDSA 签名与验签
1
2
3
4
5
| echo "hello" > plaintext.txt
# 对文件进行 SHA256 签名
openssl dgst -sha256 -sign ec_private_key.pem -out signature.bin plaintext.txt
# 公钥验证签名
openssl dgst -sha256 -verify ec_public_key.pem -signature signature.bin plaintext.txt
|
ECDH 非对称加密
Alice 和 Bob 进行非对称加密,流程与 HTTPS 握手相似,ECDH 不像 RSA 可以直接公钥加密,私钥解密,而是使用对方的公钥,配合自己的私钥生成共享密钥,加解密使用共享密钥做对称加密
 1
 2
 3
 4
 5
 6
 7
 8
 9
10
11
12
13
14
15
16
17
18
19
20
21
22
23
24
| # Alice 生成自己的密钥对
openssl ecparam -genkey -name prime256v1 -out alice_private.pem
openssl ec -in alice_private.pem -pubout -out alice_public.pem
# Bob 生成自己的密钥对
openssl ecparam -genkey -name prime256v1 -out bob_private.pem
openssl ec -in bob_private.pem -pubout -out bob_public.pem
# Alice 生成共享密钥
openssl pkeyutl -derive -inkey alice_private.pem -peerkey bob_public.pem -out shared_key.bin
# Bob 生成共享密钥
openssl pkeyutl -derive -inkey bob_private.pem -peerkey alice_public.pem -out shared_key.bin
echo "hello" > plaintext.txt
# Alice 使用共享密钥加密文件
openssl enc -aes-256-cbc -salt -in plaintext.txt -out encrypted.txt -pass file:shared_key.bin
# Alice 使用私钥对加密文件进行签名
openssl dgst -sha256 -sign alice_private.pem -out signature.bin encrypted.txt
# Bob 使用共享密钥解密
openssl enc -d -aes-256-cbc -in encrypted.txt -out decrypted.txt -pass file:shared_key.bin
# Bob 使用公钥验签
openssl dgst -sha256 -verify alice_public.pem -signature signature.bin encrypted.txt
|
生成自签名 ECC 证书
1
2
3
4
5
6
| # 使用 ECC 私钥生成自签名证书
openssl req -x509 -new -key ec_private_key.pem -out ec_cert.pem \
-subj "/C=CN/ST=Beijing/L=Beijing/O=MyOrg/OU=IT/CN=example.com" -days 365
# 查看证书的详细信息
openssl x509 -in ec_cert.pem -text -noout
|
AES
 1
 2
 3
 4
 5
 6
 7
 8
 9
10
11
12
13
14
15
16
17
18
19
20
21
22
23
24
25
26
27
28
| echo "hello" > plaintext.txt
openssl rand 16 -out key.bin
openssl rand 16 -out iv.bin
# AES-128-CBC 加解密
# -K 指定密钥(十六进制)
# -iv 指定初始向量(十六进制),一般为 16 字节
# -K 和 -iv 必须一起使用,因为 -K 不会自动生成 iv
openssl enc -aes-128-cbc -in plaintext.txt -out encrypted.bin -K $(xxd -p key.bin) -iv $(xxd -p iv.bin)
openssl enc -d -aes-128-cbc -in encrypted.bin -out decrypted.txt -K $(xxd -p key.bin) -iv $(xxd -p iv.bin)
# 可以用 -pass file: 指定文件作为密钥
# 如果使用 -pass 替代 -K 可以不需要 -iv,-pass 会自动生成 iv,并添加到 padding 头部
# -pass 可以加 -pass stdin,不使用文件密钥,可以从标准输入中读取
openssl enc -aes-128-cbc -in plaintext.txt -out encrypted.bin -pass file:key.bin
openssl enc -d -aes-128-cbc -in encrypted.bin -out decrypted.txt -pass file:key.bin
# -pbkdf2:使用 PBKDF2 进行密钥派生,openssl 3 版本默认都推荐添加
# 或者使用 -iter 100000 替代 -pbkdf2, 表示迭代 100000 次,解密也需要添加
# -p 可以打印盐值 salt,派生后的密钥 key 和 iv
openssl enc -aes-128-cbc -in plaintext.txt -out encrypted.bin -pass stdin -pbkdf2 -p
openssl enc -d -aes-128-cbc -in encrypted.bin -out decrypted.txt -pass stdin -pbkdf2
# AES-256-CBC 模式加密
openssl enc -aes-256-cbc -salt -in plaintext.txt -out encrypted.bin -pass file:./password.bin
# 解密
openssl enc -aes-256-cbc -d -in encrypted.bin -out decrypted.txt -pass file:./password.bin
|
Reference